How to Correctly Adjust a Bike
Adjusting or fitting is a part of bike maintenance.
Whether you ride on or off the road, cycling is most efficient when your bike is adjusted and fits your body right. As you develop as a cyclist, such adjustments may change and need fine-tuning.
To help you find the ideal position and perfect fit, we’ve put together this guide - assuming you already have a bike.
Adjusting Your Bike for an Optimal Position

Proper bike fit ensures you can ride as long and hard as you want while staying comfortable the entire time. This is especially important for new riders but even more vital for cyclists of all levels.
The correct position can vary and depend on different factors. These include age, riding style, and physical attributes. But all in all, you can cater your bike fit to suit your needs.
Below is a list of quick do-it-yourself adjustments to get you in the ballpark:
Get or attune the correct size

No adjustment can fix a bike that’s too small or large for you. So start by making sure your current two-wheels, or the one you wish to buy, is the correct size for you. Bike shops like Bobbin Bikes can help you find the right sizing.
On a traditional bike frame, go for a model with one to two inches of clearance between the tube and your crotch. For bicycles with sloping top tubes, at least two inches or more clearance is recommended.
You also want to consider the length; make adjustments with a longer or shorter stem if necessary. For instance, your bike is too long or short of your upper body.
Level your bike seat

A level seat offers great support for your full body weight. In turn, pedalling efficiency is in your favour and moving around on the seat (when needed) is a lot easier.
To start, place the bicycle on a level surface and see if the seat is at an even position. A good way to do this is to place a carpenter’s level on the bike seat. Alternatively, you can use a yardstick and compare its edge to a horizontal sight line, e.g. a windowsill.
While adjusting, ensure the seat angle is centred on its rails over the seat post. Top tip: If the seat doesn’t move after loosening the bolts, chances are the parts are stuck. Tap the seat with the heel of your hand to free them.
Tackle the seat height

A seat that’s too low or high can cause more than just discomfort. What’s worse, this can lead to serious injuries down the road. So adjust the seat height for continuous smooth riding!
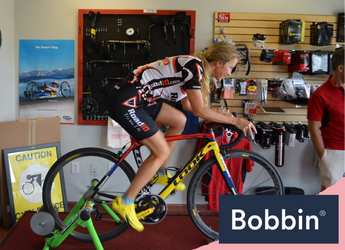
To do this, mount your bike in the trainer or place it in the doorway. Hold onto the door jamb for support, and ensure to have your helper stand behind.
Position the crank arms, so they’re parallel to the seat tube. Then sit on the seat with your heel (foot position) on the pedal. If you can’t reach the pedal, lower the seat until you can. Now, if your leg is bent at the knee, raise the seat until it’s straight.
Overall, if it feels too low or high, adjust the seat up or down, but only a bit to fine-tune the adjustment. And when you’ve found the proper position, wrap electrical tape around the post. This way, you won’t have to go through the fitting process again in the future.
Set the shoe cleat position

A correct cleat position is crucial, particularly if riding in cycling shoes. Set the cleat on the shoes, install all the bolts, and then finger tight.
To do so, you’ll focus on two adjustments, and these are the angular and fore/aft positioning. The former is easier, while the latter takes some careful trial and error.
For the angular, align the tip of the cleat to the apex of the toe box using a small ruler. Ideally, your resting feet should be in a natural position on the pedals.
For the fore-aft position, ensure the cleat is over the pedal without clipping in yet. The balls of your feet should rest over the centre of the pedal when you pedal.
Once the perfect cleat placement is set, trace lines around them. This allows you to replace a worn cleat and easily reposition a loose one. Note: It’s recommended to grease the cleat bolts lightly - for road or mountain bikes - before installing.
Adjust the handlebar position

(Image Credit: Wikimedia Commons)
Sit on your bike and reach out for the handlebars. You shouldn’t be hunching forward but slightly tilted forward instead.
If you feel the need to scoot further on the seat while riding, your stem is probably too long or vice versa. This position may also leave you experiencing neck, shoulder, back and hand pain.
When you sit in the saddle, you should be able to reach the tops and brake hoods on a road bike. Or the grips if you’re riding a mountain bike. Ensure your elbows aren’t locked, as well; instead, they should be slightly bent.
Remember, a proper reach to the handlebars is key to longer and more comfortable rides.
Other Things to Consider
As mentioned, ensuring you’re on the correct size frame is the first place to start. Fortunately, most bike companies have sizing charts on their websites. Take advantage of this availability when shopping online.
When choosing a saddle, they come in different widths to accommodate a variety of riders. You may ask the bike shop owner to help you find the right size. Some even have test saddles so you can see if a particular model works for you while out on a ride.
For changing the handlebar size, check the width first. Ideally, it should be about the same width as your shoulders for optimal control. Consider the shapes, too; there are flat, drop and bent designs.
Your body will also need time to adapt to position changes, especially if the fit has changed a lot. Experts recommend backing off the volume and intensity of your riding for a couple of weeks. This will give your body enough time to adjust.
Feel free to seek an expert bike fitter’s advice. They have plenty of experience in helping you to find a comfortable position. And once you’ve gotten these things sorted, you’ll be enjoying your riding more every day!
Round-up
Cycling shouldn’t be uncomfortable, so if you are, it’s time to start making some changes. Adjusting or fitting your bicycle ensures it fits you properly. It also gives you good handling in all circumstances and more productive rides.
If you’re considering getting a new one, we’ve got a store-full, from kids bikes to adults bikes. For upgrades, you’ll also love our range of bike accessories.


