How to Wheelie on a Bicycle - A Guide for Kids
Wheelies are fun, but they’re also harder than they look—and that’s exactly why kids see them as a fun challenge. It takes practice and timing to learn the trick, and this guide shows how to wheelie on a bicycle in a clear, safe way.
For parents, this is where to start in teaching your younger rider:
1. Set Up Your Kid’s Bike
Take a few minutes to check that the bike is set up in a way that makes learning how to wheelie on a bicycle easier and safer. Start with the saddle and make sure it’s lowered a bit, so your child can have the space to shift their weight and keep balance.
Next is to set the bike to a lower gear, around second or third. Too high, and they might struggle to get the wheel off the ground. Too low, and they might lift too fast and lose control.
Finally, check the rear brake. Make sure it’s working and that your child knows how and when to use it. For one, they’ll need it to control how far the front lifts. If they start tipping too far back, tapping the rear brake will bring the front wheel down again.
2. Help Them Start in a Steady Position
Here’s where it starts to count. A wheelie won’t happen if the rider isn’t balanced before they push off. Have your child sit on the saddle with their stronger foot at the top of the pedal stroke. That foot should be ready to push down hard when they start.
Their arms should have a slight bend, not locked out, for more control. And remind them to keep their eyes forward.
At this stage, don’t worry about how far the wheel comes up. What matters is that they’re starting in a way that gives them the best chance to lift the wheel safely.
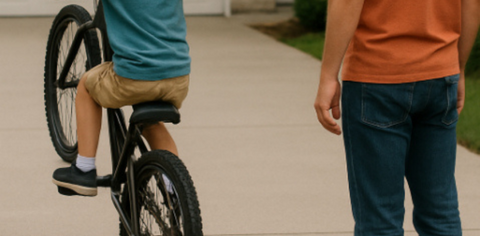
3. Lift the Front Wheel

Now they’re putting it all together—power, timing, and control. This is the part where the wheelie happens.
Ask them to push down hard with their front foot while pulling up on the handlebars at the same time. Their weight should shift slightly back as the front wheel comes up. You’re looking for a small, steady lift, and not a big pop off the ground.
They might only get the wheel up for a second, or it might not lift at all on the first few tries. That’s part of learning!
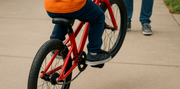
4. Find the Balance Point
This step takes practice. The balance point is where the front wheel stays up without tipping too far back or forward. It won’t feel natural at first, but that’s normal.
As they practise, remind your kid to use the rear brake if the front comes up too far. A quick tap is enough to bring the front wheel back down and give them a way to reset without falling backwards.
Shifting their weight helps too. If the wheel drops too fast, they can lean back a bit. If it starts tipping too far, leaning forward brings it under control. They’ll learn to adjust this on the go, but it takes trial and error to get the feel for it.
5. Keep Them Pedalling to Stay Up
To hold the wheelie, your child needs to keep pedalling in small, steady strokes. One strong push won’t be enough—the bike needs consistent movement to stay balanced.
Tell them not to pull on the handlebars. If they rely on their arms too much, they’ll lose control. Most of the balance comes from how they pedal and shift their weight.
It won’t stick every time, and that’s expected. The more they try, the more they’ll understand how to hold it.
6. Don’t Expect It to Click Straight Away
Most kids won’t get the hang of it in the first few tries. The wheel might not lift, they might tip too far, or they’ll land as soon as they pull up. Encourage short practice runs instead of long sessions.
You can also help by setting small goals. Lifting the wheel for even two seconds is a good start. From there, they’ll build confidence and start to notice what helps them stay up longer. Progress might be slow, but they’ll know when it’s working.
Wheelies take focus, so ensure they’re riding in a safe spot: no traffic, no busy footpaths. An empty car park, wide driveway, or open field will do. And always make the bike helmet non-negotiable. It’s a habit worth locking in from the start. Good luck!
Related Posts

Can You Use a Mobile Phone While Cycling?
Cycling with a phone in hand is more common than it should be. Some...
Easy Bike Tricks That Your Kids Can Try Safely
This isn’t a list of wild stunts, but a set of easy bike tricks for...
Guide to Cycling on Roundabouts
Have you ever hesitated before a roundabout on your bike? If so, we...