
How to Perform a Bike Safety Test
Before you hit the road, be mindful of the cycling rules – one of them is the bike safety test.
Bicycles have the power to put anyone back on their feet and begin one’s journey. There is also a special kind of freedom and a sense of adventure in riding one. All it takes are two wheels, and you can see the world from another perspective.
But before you enjoy that bike ride experience, get into a habit of doing a quick safety check. This will ensure that your two-wheeler is in good condition, as well as your safety from a host of hazards.
Keep reading and learn how to do it like a pro!
Cycling Rules & Testing

Bike riding is fun, but accidents can happen, particularly on busy roads. Thus, bicycle riders, no matter their age, must follow the road rules. Wearing cycle helmets, for one, is part of the safety standards, but there’s more than to it.
This is where the ‘testing’ comes into play. It’s focused on the ability to maintain bike control by the rider. It applies to whatever type of bicycle you own, ideally prior to the ride or at least once a week.
The ABC Method
There are a few things you need to check before every ride, and experienced riders are no exception. To get you into this good practice, start with the ABC approach and further your way over time.
A for ‘air’

(Image Credit: Wikimedia Commons)
To begin your cycle training for safety, check your tire pressure. The last thing you want is to have a flat tire and not be able to fix a tyre. The key here is to have well-maintained and properly inflated tires.
- Squeeze each tire; they should feel hard - otherwise, they need some air.
- Check the recommended pressure, which is usually printed on the side. It’ll be measured in psi (pounds per square inch) - 35 to 65 psi, for instance.
- Take out your patch kit and get the gauge to check the pressure for each tire.
- Inflate to the ideal pressure and not to the maximum amount. Start in the middle of the pressure range, and you may adjust for comfort. A higher psi is better for traction, while a lower pressure is for off-road riding.
- Check your tires for wear and tear. If you have them, it’s time for a replacement.
Knowing how to change a bike wheel can also be a life skill for a cyclist.
B for ‘brakes’

(Image Credit: Trusted Reviews)
Brakes, including brake levers, ensure ‘loss of control’ is less likely to happen. Simply put, good-working brakes allow you to stop when you need to.
They similarly mount to your handlebars as mountain bikes. To test, they should hold firmly without squealing and make sure the pads aren’t rubbing the rim or rotor.
- Inspect the brake pads. If there’s less than a quarter inch of pad left, replace them.
- Turn the bike over off the ground and spin the wheel. Adjust the pads if they rub the rim.
- Check the brake levers. There should be two inches of space between the lever and the handlebar before squeezing. If the brake isn’t engaging, bring your bike to a mechanic to have them take a look. For hydraulic disc brakes, you may need a brake bleed which is best performed by a professional.
Don’t ride the bike if your brake isn’t working to its full potential.
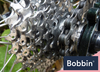
C for ‘components’

The letter ‘C’ can work double-duty, paired with cleaning. Any type of bicycle is a collection of moving parts. When these components get dirty, mainly the drivetrain, wear and deterioration will occur.
Even if you ride on clean and quiet roads, you’ll need to degrease and re-grease every 100 miles. Then get to inspecting and then cleaning the other parts.
- Start with the crankset, where the crank arms and chainrings are. Inspect them for cracks and dents, then grab one of the crank arms and gently shake it. There shouldn’t be any looseness; if there is, tighten the bolt.
- Don’t forget to check the pedals as well. Ensure they spin freely and evenly and that you’re not feeling any rocking motion when doing so. Otherwise, the latter can mean you have a bent pedal or crank arm that needs to be replaced.
- If everything in the crankset appears in order, finish up with cleaning. Lift the chain off and clean the chainring, ideally with a rag and brush. Repeat the cleaning process with the rear sprocket/cassette.
- Next, inspect the bike chain for wear and damage. You don’t want to see these rollers hanging loose. If they're grimy, clean them with a solvent and give them a good brush. Once cleaned, lube the chain and turn the crank to get it moving.
This ‘How to Oil a Chain’ guide will walk you through the steps on how to do the job well.
Another pre-ride safety check:
- Inspect the cables and housing and make sure there’s no frying or splitting.
- Ensure the wheel quick-release levers are secure.
- Check for any loose parts or other mechanical problems, and fix them right away if necessary.
Now that you know what to do during pre-ride testing, prioritising road safety is also important.
Gear Up for More Safety Test Tips
There’s more! Here are some essential checks to perform on your bike to guarantee a safe and enjoyable ride:
1. Tires and wheels

Among the fundamental components to inspect is the condition of the tires and wheels. Start by checking the tire pressure. Ensure that it matches the recommended level specified on the sidewall of the tire. Proper tire pressure helps maintain stability, control, and grip on different surfaces.
Additionally, examine the tires for signs of wear, cracks, or bulges. Such issues can indicate the need for replacement. Inspect the wheels for loose or broken spokes. You’ll want to ensure they spin freely without wobbling.
2. Chain and drivetrain
The chain and drivetrain play a crucial role in transferring power from your legs to the wheels. Conduct a thorough examination of the chain by inspecting its tension and lubrication. The chain should have minimal slack but should still be able to move freely.
Lubricate regularly using a bicycle-specific lubricant to reduce friction and extend its lifespan. Examine the cassette, chainrings, and derailleur for signs of excessive wear or damage. Proper maintenance of the drivetrain ensures smooth gear shifting and efficient pedalling.
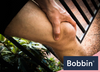
3. Pedals and cranks

(Image Credit: Wallpaper Flare)
Pedals and cranks are essential components, enabling you to generate power while cycling. Make sure the pedals are attached to the crank arms and spin freely without any grinding.
If you notice any looseness or play in the bearings, they may need adjustment or replacement. Inspect the crank arms for cracks, and tighten them securely to the bottom bracket. Remember to check the pedals’ grip surface and replace them if they are worn or damaged.
4. Suspension systems (if applicable)

If your bike features suspension systems, e.g. front forks or rear shocks, inspect and maintain. Start by checking the suspension for signs of leakage or damage, such as oil stains or dents.
Ensure that the suspension operates smoothly and responds appropriately to compression and rebound. Follow the manufacturer’s recommendations for maintenance, including periodic cleaning, lubrication, and servicing.
5. Lights and reflectors

(Image Credit: Wallpaper Flare)
Visibility is crucial for your safety. This is especially vital when riding in low-light conditions or at night. Check that all lights, including front and rear lights, are functioning properly.
Replace any burned-out bulbs. You also want to make sure the batteries are charged or replaced as needed.
Next, inspect the reflectors on your bike, such as those on the wheels, pedals, and front and rear of the bike. Reflectors significantly improve your visibility to motorists. This makes it easier for them to spot you on the road.
6. Seat and handlebars
Proper bike fit is essential for comfort and control. Check the seat height and adjust it accordingly. Doing so helps ensure your leg has a slight bend at the knee when the pedal is at the bottom of the stroke.
Examine the seat for any signs of wear or damage and make sure it is securely fastened to the seat post. Similarly, inspect the handlebars for tightness. They should be straight and aligned with the front wheel. Adjust the height if necessary, making sure it’s comfortable for your riding style.
Maintenance and Repairs
After performing the bike safety test, take prompt action to address any issues. Prioritise the issues based on their severity and impact on safety. Make a list of identified problems to ensure you don’t miss any.
For minor repairs and adjustments, consult user manuals for guidance. Gather the necessary tools and follow proper procedures. Common DIY repairs include fixing a punctured tire and tightening loose components.
Complex issues, unfamiliar repairs, or lack of confidence may warrant professional assistance. Seek a reputable bike shop or mechanic for more advanced repairs. The same applies if you lack the necessary tools and knowledge.
Finally, implement a regular maintenance routine to ensure ongoing safety. Perform routine checks and maintenance tasks. These can be cleaning the bike, lubricating the chain, and checking tire pressure. Create a maintenance schedule based on your riding frequency and conditions.
Prioritising safety is paramount. If you are unsure about your ability to handle repairs, seek professional assistance. This guarantees your bike is in optimal condition and safe to ride.
Bicycle Safety Tips: Equipment

No safety test checklist is complete without a review of the equipment. This bicycle testing tip applies to both the vehicle and the bike riders.
With a wide range of safety products available, go with the simple ones with good protection in mind. On the bike, being safe means being seen. You should have reflectors and lights.
- Reflectors must be positioned on both the front and back of the bike. Go for a red colour for your rear reflector or on the back of the saddle. Consider getting amber pedal reflectors, too.
- For night bike riders, lights are crucial. Consider a white front light with a steady beam and a flashing red for the rear light.
- If you’re riding in a flow of traffic, attach an orange flag that extends several feet above the bike. A horn or bell is a good idea, too.
Check if the ones on your bicycles are still working.
Bicycle safety tips on the rider, wear reflective clothing so you can be seen. Plus, wear equipment to protect yourself from injury.
- The golden rule is never to ride without a bike helmet. The risk of head injuries is real and serious. Bicycle helmets must fit correctly and are Consumer Product Safety Commission-approved.
- Other safety equipment includes elbow and knee protectors, mouth guards, and gloves.
- Always wear bright clothes so others will see you better, particularly at night. Wear closed-toed shoes and never ride barefoot. As for pants, avoid loose ones that can get caught in the chain.
- Bring your cell phone with you as much as possible for communication in case of emergency. Plus, a maintenance bag, such as a patch kit.
Round-up
Going over a detailed bike safety test every time you go out for a ride can be overkill. But once you’ve gotten into the habit, doing it will seem like second nature.
Following the ABC method will go a long way to enjoying your road adventures and help you prevent a long walk home. It may only take a few minutes but will help prevent avoidable accidents, as well.
Click here to browse our full range of adult bikes, kids bikes and hybrid bikes.
Related Posts
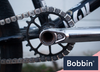
What Is a Bike Sprocket?
Every component in your Bobbin bike plays a role in the smooth oper...
Most Frequent Cycling Injuries and How to Treat Them
Cycling is a thrilling blend of freedom and fitness. While the bene...
Why Do BMX Bikes Have Small Sprockets?
In BMX riding, every trick, jump, and turn demands precision and co...


